

Chimney flashing, side
Chimney flashing
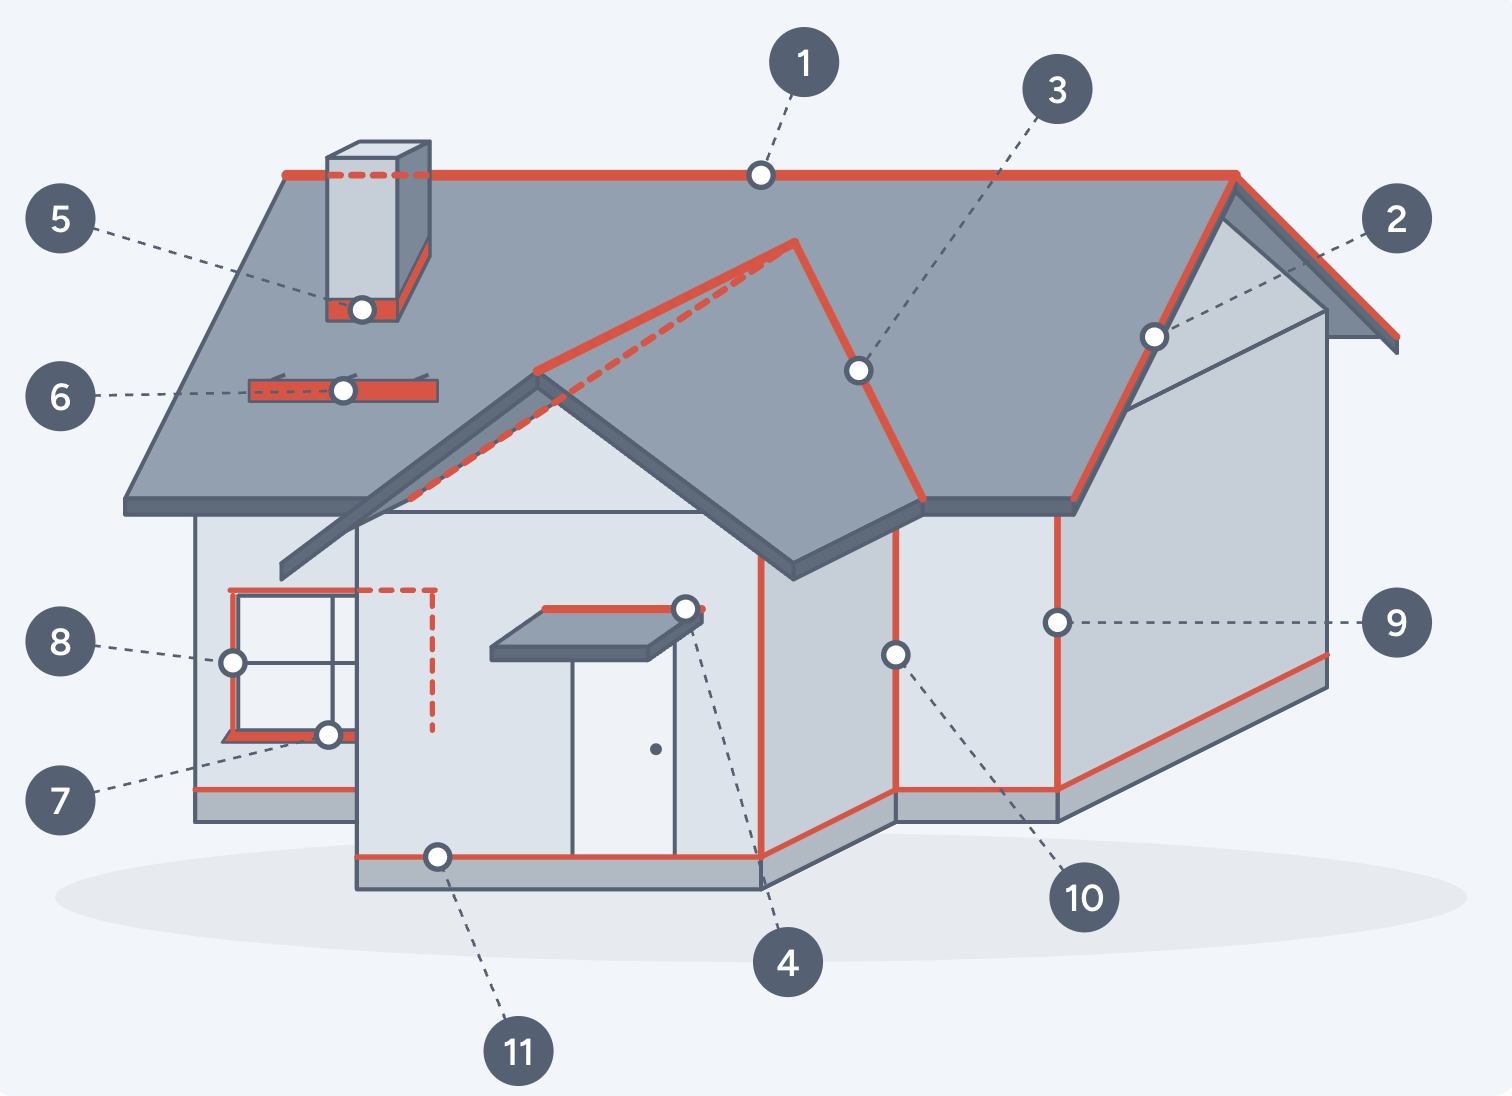
What flashings do, where they belong and how they are fitted.
Flashings, or trims as they are also called, close the joints, edges and openings in roofs and walls so that water cannot get in. This page covers what a flashing is, where it is used, how it is fitted and which profiles we make.
A flashing is a thin sheet of coated steel bent into a particular profile and laid over the joints, edges and openings in roof and wall cladding. Its job is to lead the water out and over the joint so that it never gets in under the cladding. A flashing does not seal with sealant but with overlap, like roof slates. Each piece lies over the one below it and the water always runs on top of the metal.
Our flashings are bent from the same 0.6 mm aluminium-zinc coated steel as the corrugated sheet, either unpainted or in the same colour as the cladding. They therefore last as long as the roof itself.
Wherever the cladding ends, changes direction or meets another part of the building, a flashing is needed. That applies to ridges and roof edges, valleys, the junction between roof and wall, chimneys and pipes that come up through the roof, windows and doors, the corners of the house and the bottom edge of the cladding at the plinth. The drawing shows where each flashing belongs.
The same principles apply to every flashing, whatever the profile.
The lap always follows the water. The upper piece lies over the lower one so that the water runs over the joint and not into it. Allow at least 100 mm of lap between pieces and about 300 mm in valleys, where the most water collects.
Keep the joints to a minimum. Flashings are usually supplied in 2.5 to 3 m lengths and never longer than 4.2 m. Longer is not better: the steel expands and contracts with temperature and needs room to move at the joints.
On a roof the flashing is fixed through the crest of the rib, never in the valley where the water runs. Use roofing screws or ring-shank nails with a sealing washer, at a typical spacing of 250 to 300 mm.
The bottom edge of a flashing is folded back into a hem. That stiffens the piece, hides the cut edge and forms a drip edge that sheds the water clear instead of letting it be drawn in underneath.
Before the ridge flashing goes on, the valley of the rib at the top end of the corrugated sheet is turned up. That keeps water and drifting snow from getting in under the ridge.
Sealant and sealing tape are only a backup at joints and fixings. It is the lap and the fall that keep the water out, and on a well-made flashing there is little or no sealant to be seen.
Dissimilar metals must not lie together. Copper and lead cause corrosion in contact with aluminium-zinc coated steel, so fixings should be stainless steel or the same material as the flashing.
Edge flashing on a gable covers the two outermost crests and runs about 6 cm down over the roof edge, with a hem at the bottom. It is fixed through the crest at about 300 mm spacing. On the long sides it covers the roof edge and runs down into the gutter.
Valley flashing is laid in the valley under the corrugated sheet, at least 300 mm to each side of the centre line of the valley, and the sheet ends on top of it. Never nail through a valley flashing: every hole in it is a leak.
Chimney flashing comes in three parts. The lower piece lies on top of the sheet below the chimney, the side pieces run up along the sides and the upper piece goes under the sheet above the chimney, so that the water coming down the roof runs over it and past the chimney.
Snow guard holds snow and ice on the roof so that it does not slide off the edge in one piece. It is fitted low on the roof slope, especially above entrances and walkways, and fixed with roofing screws and adhesive sealant in the crest or the valley at about 40 cm spacing.
Here are all the flashing profiles in our catalogue. Each one is bent to measure, in the length, with the legs and in the colour the job calls for. If you cannot find the profile you need, you can draw it yourself.
On the ridge, at the top of the roof where the two roof planes meet.
On the roof edge, at the gables and where needed along the long sides, where the roofing sheet ends. It laps over the outer corrugations and down onto the fascia.
In the roof valley, where two roof planes meet and form a channel running down to the eave.
Where a roof or canopy meets a rising wall. It runs up the wall and out over the roof.
All the way around the chimney where it passes through the roof: a lower piece, side pieces and an upper piece.
Low on the roof plane, parallel to the eave, especially above entrances and walkways.
A sill flashing below the window and a head flashing above it.
Along the sides of windows and doors, tight against the frame.
On a vertical outside corner of the house, where two walls meet and the cladding turns outward.
In a vertical inside corner, where an extension meets the main wall of the house.
At the bottom of the cladding by the plinth, and on other edges and joints in the cladding.
Chimney flashing
Chimney flashing
Chimney flashing
Corner flashing
Corner flashing
Corner flashing
Corner flashing
Corner flashing
Corner flashing
Edge flashing
Edge flashing
Edge flashing
Ridge flashing
Ridge flashing
Side piece
Side piece
Side piece
Simple flashing
Simple flashing
Simple flashing
Simple flashing
Simple flashing
Simple flashing
Snow guard
Snow guard
Trim strip
Trim strip
Trim strip
Trim strip
Trim strip
Window flashing
Window flashing
Window flashing
Window flashing
Window flashing
Draw your own flashing from scratch.